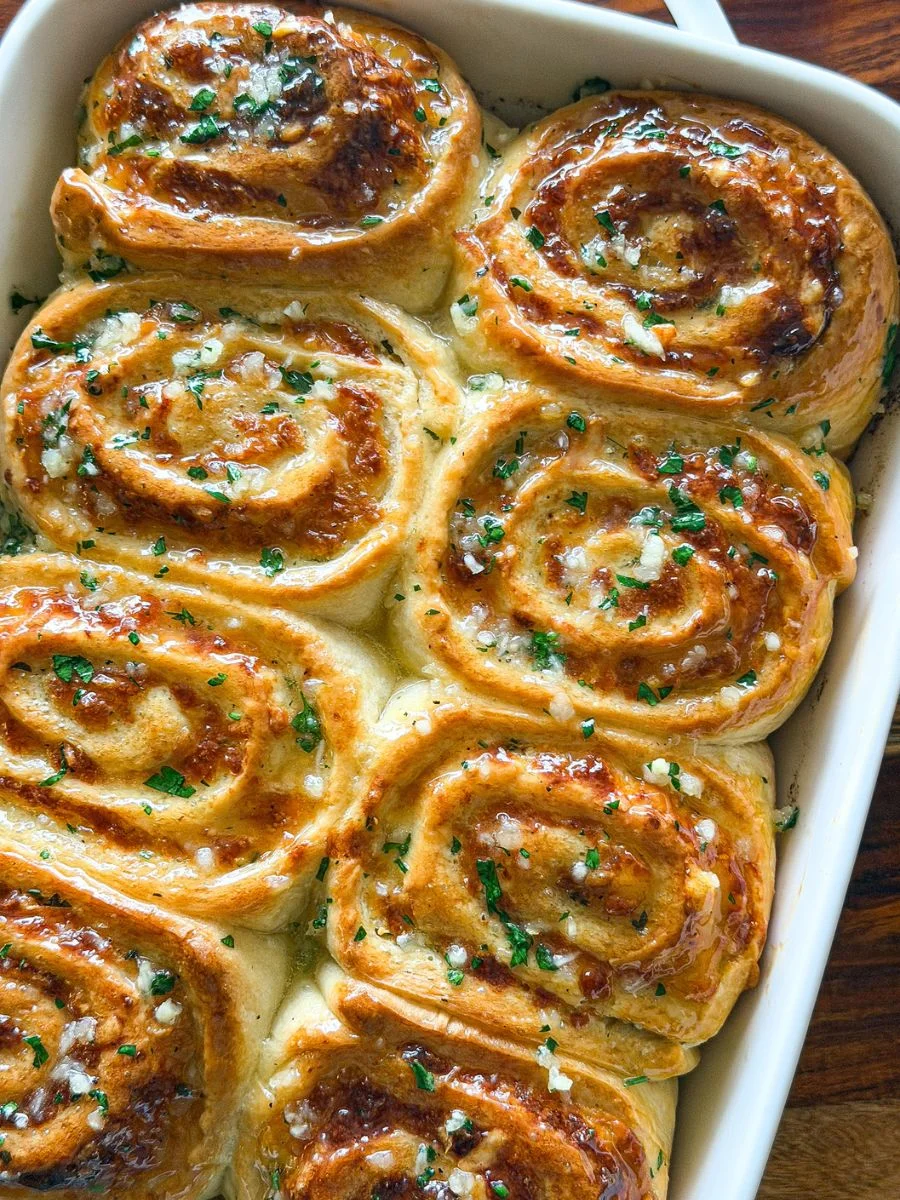
There’s nothing quite like the smell of freshly baked bread filled with garlic and melted cheese drifting through the kitchen. These Cheesy Garlic Rolls take that comforting experience to another level, combining soft, fluffy dough with rich garlic butter and gooey layers of mozzarella and parmesan.
Each roll is tender on the inside with a lightly golden exterior, and when you pull one apart, you get those irresistible strands of melted cheese. The garlic butter seeps into every layer, giving each bite a deep, savory flavor that pairs perfectly with the creamy, cheesy filling. It’s the kind of side dish that easily steals the spotlight.
What makes these rolls truly special is how versatile they are. They fit right in alongside pasta dinners, holiday spreads, or even as a snack on their own. While they look impressive, the process is straightforward and incredibly rewarding, especially when you see those perfectly risen, golden rolls come out of the oven.
Why I Keep Making This Rolls?
These rolls have become one of my favorite homemade bread recipes because they never fail to impress people. Every time I set a pan of warm cheesy garlic rolls on the table, they disappear faster than almost anything else.
What makes them special is the balance between the soft bread and the cheesy filling. The dough bakes up incredibly fluffy while the mozzarella melts into those stretchy layers that everyone hopes for when pulling apart a roll.
I also love how satisfying they are to make. Watching the dough rise, rolling it up with garlic butter and cheese, and seeing the golden rolls emerge from the oven feels rewarding every single time.
The first time I made these, I expected them to be a simple side dish. Instead, they became the main attraction. People were reaching for second and third rolls before finishing the rest of their meal, and now they’re requested whenever I make pasta or soup.
What Kind of Cheese Should I Use?
- This recipe uses mozzarella and parmesan, and that combination works so well. Mozzarella melts into that stretchy, gooey layer. Parmesan adds a little salty flavor.
- I like shredding the cheese myself if I can. It melts a bit smoother. But pre shredded cheese works just fine if that is what you have.
- You can also try a little Monterey Jack in place of some mozzarella if needed. Just keep the total amount the same.
Variations You Can Mess Around With
- Add cooked bacon bits into the filling for a smoky flavor.
- Mix in a little cheddar cheese for a sharper taste.
- Add red chili flakes to the garlic butter for a slight heat.
- Use whole wheat flour for part of the dough for a heartier texture.
- Stuff with a mix of cheeses like provolone or gouda for variety.
The Secret to Soft and Fluffy Rolls
The key to soft rolls isn’t extra butter or extra cheese.
It’s allowing the dough enough time to rise properly.
When the yeast has enough time to work, the dough becomes airy and light. Rushing the rise often leads to dense rolls that don’t have the same fluffy texture.
Another important factor is avoiding too much flour. The dough should feel slightly tacky but still manageable. Adding excessive flour creates heavy rolls instead of soft ones.
How To Make Cheesy Garlic Rolls?
Equipment
- Stand mixer
- Mixing bowls
- Rolling pin
- Baking pan
- Knife
- Brush
Ingredients
Rolls Dough
- 3 1/2 cups (455g) all purpose flour
- 2 1/4 teaspoons active dry yeast
- 1 tablespoon granulated sugar
- 1 teaspoon salt
- 1 large egg, room temperature
- 1 cup (240ml) whole milk, warmed to 100-110F
- 6 tablespoons (85g) unsalted butter, softened
Garlic Butter
- 1/2 cup unsalted butter, room temperature
- 2 tablespoons finely minced garlic
- 2 tablespoons fresh parsley, finely chopped
- Salt to taste
- Black pepper to taste
Cheese Filling
- 3 cups mozzarella cheese, shredded
- 1/2 cup parmesan cheese, shredded
Egg Wash
- 1 large egg
- 1 teaspoon water
Instructions
Step 1:
In the bowl of a stand mixer, combine the warmed milk, sugar, and yeast. Cover and let it sit for about 8 to 10 minutes until it looks foamy.
Step 2:
Add the egg, flour, and salt to the bowl. With the dough hook attached, mix on low speed until a dough begins to form.
Step 3:
Add the softened butter a little at a time. Once fully mixed in, increase the speed to medium and knead for 5 to 6 minutes. The dough should be smooth and slightly tacky.
Step 4:
Transfer the dough to a lightly greased bowl using greased hands. Cover with plastic wrap and let it rise in a warm spot until doubled in size, about 60 to 90 minutes.
Step 5:
While the dough rises, mix the garlic butter. In a small bowl, combine the butter, minced garlic, parsley, salt, and black pepper. Stir well and set aside.
Step 6:
Once the dough has risen, gently press it down and let it rest for 5 minutes. On a lightly floured surface, roll it into a 12 by 16 inch rectangle. Spread about two thirds of the garlic butter over the dough. Sprinkle evenly with mozzarella and parmesan.
Step 7:
Starting from the long side, roll the dough into a log. Use a serrated knife to cut into 8 even pieces, about 2 inches thick. Place them in a generously greased 9 by 13 inch baking pan. Cover and let rise again for 25 to 35 minutes, until doubled.
Step 8:
Preheat the oven to 350F. Whisk together the egg and water. Brush the tops of the rolls lightly with the egg wash.
Step 9:
Bake for 25 to 30 minutes, rotating the pan halfway through, until golden brown and cooked through. If they brown too quickly, loosely cover with foil.
Step 10:
Melt the remaining garlic butter and brush it generously over the warm rolls before serving.

Cheesy Garlic Rolls
Ingredients
Equipment
Method
- In the bowl of a stand mixer, combine the warmed milk, sugar, and yeast. Cover and let it sit for about 8 to 10 minutes until it looks foamy.
- Add the egg, flour, and salt to the bowl. With the dough hook attached, mix on low speed until a dough begins to form.
- Add the softened butter a little at a time. Once fully mixed in, increase the speed to medium and knead for 5 to 6 minutes. The dough should be smooth and slightly tacky.
- Transfer the dough to a lightly greased bowl using greased hands. Cover with plastic wrap and let it rise in a warm spot until doubled in size, about 60 to 90 minutes.
- While the dough rises, mix the garlic butter. In a small bowl, combine the butter, minced garlic, parsley, salt, and black pepper. Stir well and set aside.
- Once the dough has risen, gently press it down and let it rest for 5 minutes. On a lightly floured surface, roll it into a 12 by 16 inch rectangle. Spread about two thirds of the garlic butter over the dough. Sprinkle evenly with mozzarella and parmesan.
- Starting from the long side, roll the dough into a log. Use a serrated knife to cut into 8 even pieces, about 2 inches thick. Place them in a generously greased 9 by 13 inch baking pan. Cover and let rise again for 25 to 35 minutes, until doubled.
- Preheat the oven to 350F. Whisk together the egg and water. Brush the tops of the rolls lightly with the egg wash.
- Bake for 25 to 30 minutes, rotating the pan halfway through, until golden brown and cooked through. If they brown too quickly, loosely cover with foil.
- Melt the remaining garlic butter and brush it generously over the warm rolls before serving.
Notes
Nutritional Information
| Nutrient | Amount |
|---|---|
| Calories | 510 kcal |
| Carbohydrates | 47 gm |
| Fat | 30 gm |
| Protein | 16 gm |
Note: Nutritional values are approximate and may vary depending on ingredient size, quality, brand, location, and the proportions used. All nutritional information is calculated on a per-serving basis.
If you are following a medically restrictive diet, please consult your doctor or registered dietitian before preparing this recipe for personal consumption.
Common Mistakes to Avoid
- Using milk that is too hot, which can kill the yeast.
- Not allowing enough rising time, resulting in dense rolls.
- Adding too much flour, making the dough dry.
- Overbaking, which can dry out the rolls.
- Skipping the second rise, which affects texture.
How I Like to Serve These
- Alongside pasta dishes like spaghetti or lasagna.
- With soups for a comforting combination.
- As a side for holiday meals.
- With marinara sauce for dipping.
- Served warm as a snack on their own.
Storage / Leftovers and Next-Day Thoughts
- Store in an airtight container at room temperature for up to two days.
- Refrigerate for longer storage up to four days.
- Reheat in the oven to restore softness and warmth.
- Brush with extra butter before reheating for added moisture.
- Best enjoyed fresh, but still delicious the next day.
Final Thoughts
Cheesy Garlic Rolls combine everything people love about homemade bread, garlic bread, and melted cheese into one irresistible recipe. The soft, fluffy dough, rich garlic butter, and gooey cheese filling create a side dish that’s often more memorable than the main course.
Whether you’re serving them alongside pasta, soup, holiday meals, or simply enjoying one warm from the oven, these rolls deliver comfort and flavor in every bite.
And if you’re anything like me, you’ll quickly learn one important lesson: make extra. A single pan rarely lasts as long as you think it will.
FAQs
Can I freeze Cheesy Garlic Rolls?
Yes. Allow them to cool completely, then freeze in an airtight container for up to 2 months.
Can I make these without a stand mixer?
Absolutely. Knead the dough by hand for about 8 to 10 minutes until smooth and elastic.
Why didn’t my rolls rise?
The most common causes are inactive yeast, milk that was too hot, or a room that was too cold.
Can I add extra garlic?
Yes. If you’re a garlic lover, you can easily double the garlic in the butter mixture.
What cheese creates the best cheese pull?
Low-moisture mozzarella provides the best stretch while still baking evenly.
Can I prepare them the night before?
Yes. This recipe works extremely well as an overnight refrigerator dough.

I’m Emma Parker, the writer and founder behind Emma’s Home Guide. This blog was created to share practical ideas, honest experiences, and helpful guidance for everyday living. My goal is to make home life feel easier, warmer, and more enjoyable, without pressure or perfection.